Page : Links

Saturday, August 20, 2011

Robert Kaufman - Kona Charm Pack Challenge

The Modern Quilt Guilds across the US were given a challenge by Robert Kaufman fabrics to create a solids only quilt made from a Kona fabric charm pack given from Robert Kaufman fabrics! Who doesn't like free fabric?!
So for this challenge, the charm pack was given 44 different 5x5" fabrics. Our guild decided we needed to use at least 30 of those charms. I was able to pull out the pinks, reds, and purples and have exactly 30 left to make this a 'boy-ish' themed quilt. I initally was going to take my almost-2-year-old out of his crib and put him into a toddler bed, and this quilt would be perfect for a toddler or twin bed top spread. Silly me, why would I take my baby toddler out of his crib, when he is just fine in there still. He doesn't even climb out yet. I think I was just anxious to have this on the toddler bed. ;)
So the quilt now has become a nice lap body length quilt for laying on the couch in the living room.

And here is my progress:
Started with taking each charm square and sewing it to a random strip of Kona Coal grey..
Robert Kaufman Kona Solids Challenge
I did this for all 30 charms. Then sewn two charms side to side, with the grey on the outside. Sewn all 15 rows together. Then trimmed off the excess on the grey strips. And added two long grey pieces, to add more grey to the sides..


This was my first time using spray adhesive for sandwiching the backing, batting, and top of the quilt together. It was really quite easy and will probably do it from now on!
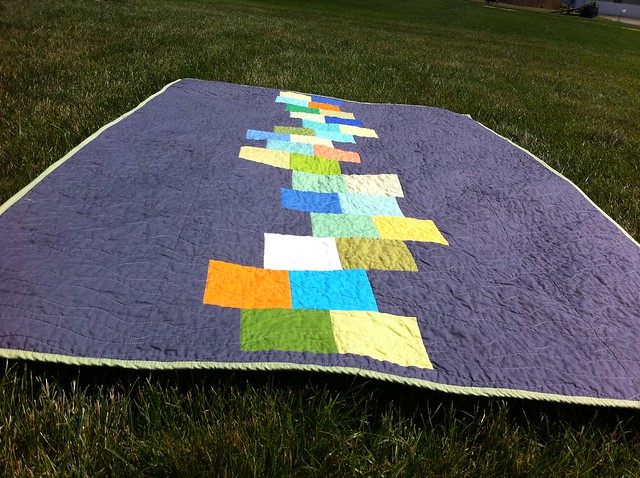
I did just a simple wavy pattern for the quilting with my walking foot..
Robert Kaufman Kona Solids Challenge
And here it is with all the stitching done on it, with detail pic too..
Robert Kaufman Kona Solids Challenge

I had some Kona that I bought from JoAnns a few months ago, don't remember the color name, but I used that for the binding, as it was one of the colors in my palate...
Robert Kaufman Kona Solids Challenge
I pressed it in half and sewn it on..
Robert Kaufman Kona Solids Challenge

I really wanted to do a hidden stitch, but was short on time. I literally made this quilt within 24 hours of our meeting! And we had 2 MONTHS to do this challenge. What?! I didn't tell you that detail in the beginning?! :0
So I put in a large stitch that would be easy to go back and take out, when if I found time to do the blind stitching.
Robert Kaufman Kona Solids Challenge

And here it is just after completing it in my sewing room space, in my basement..
Robert Kaufman Kona Solids Challenge

Of course I had to take it outside after its first wash and dry..
Robert Kaufman Kona Solids Challenge
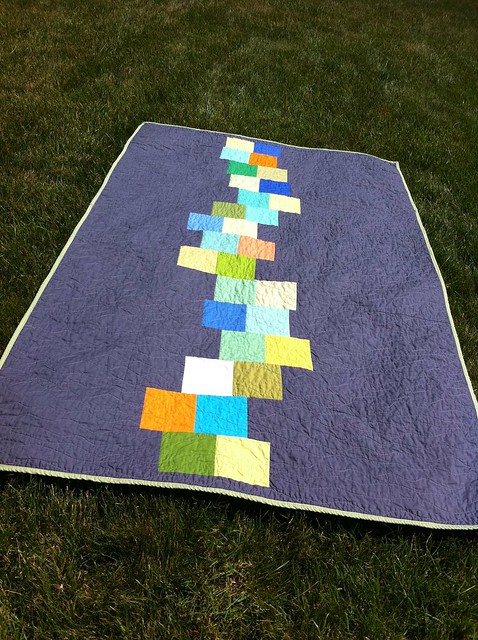
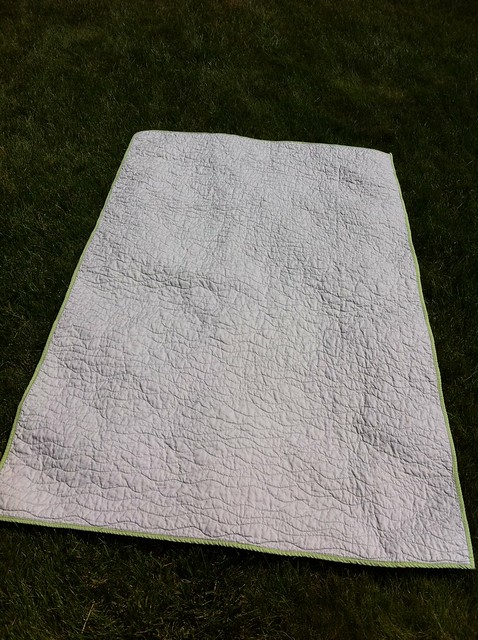
The back was just a solid Ash Grey.. no time for a pieced back..
Robert Kaufman Kona Solids Challenge

Thanks for reading my Kona Solids Challenge process! You can check out the other quilts done by my other guild members at Ann Arbor Modern Quilt Guild HERE!

Friday, August 19, 2011

Baby H. C.

For all the orders that I've done I think I've only done ONE other boy item.. and that was just a crib skirt. So this set was really neat to put together, because it let me use all the boy tones and prints that are really cute for a baby's room. This mom and I worked hard to get colors and patterns to match up. We tried several different combinations until we found 6 fabrics that worked perfectly. And after getting the set (almost) complete and seeing it in her baby's room, definitely made the time it took to decide onthe fabrics. :)

We chose these fabrics:
Urban Circus by Laurie Wisbrun / Robert Kaufman - Pachyderm Parade in Earth (lt. blue elephant)
Urban Circus by Laurie Wisbrun / Robert Kaufman - Pachyderm Dot in Earth (green elephant)
Moda Wee Woodland Stripe Orange by Keiki
Khristian Howell - Theory / Rainforest Leaves in Seaside
Robert Kaufman - Groove Abstract Earth
Khristian A Howell - Lattice in Sierra (brown lattice)

Fabric for Etsy Client
 
I started with the bumper:
Cut the pieces and laid them in the pattern..
Piecing Bumper Pad for Etsy client
Sewn them together..
Piecing Bumper Pad for Etsy client
Covered the cording and made the bumper pad ties..
Piping and Ties for Etsy Client
Sewn the two sides together with the piping and ties, leaving an opening in the bottom to put the Nufoam bumper pad into..
Bumper Pad for Etsy client
Inserted the foam and closed off the opening in the bottom...
Bumper Pad for Etsy client
Did the same for the other pieces, and now the bumper pad is done!
Bumper Pad for Etsy client
 
Then while at a friend house for a craft day/night, I was able to do the crib skirt and the crib sheet...

Crib Skirt for Etsy client

Crib Sheet for Etsy Client

Next I worked on the two curtain panels, piecing them together..

Lined the back of them with a muslin fabric, and put tab tops on the top of them. Her window is a shorter window than mine here, shorter and wider. So there are two curtain panels made identical to this one shown.


Lastly, I made the changing pad cover, which fits contoured or flat changing pads. They have full elastic all the way around.


I still have to make the Crib Hanging Toy Bag, and the Crib Quilt. But I wanted to send these items to her as soon as they were done because little H was coming soon! I'll finish up these other two items and will blog them next week. :)
 
She got her package today in the mail and set things up and was nice enough to send me pics by text! Her Mother-In-Law was still ironing out the folds in the curtain panels, so we didn't get any pics of those yet. But Im looking forward to seeing them and then adding the other items to the baby room next week!
Bumper Pad, Crib Sheet, Crib Skirt for Etsy Client
Changing Pad Cover for Etsy Client
 
Thank You Sarah!

Baby S. M.

I've been working on and off again on this order for a bit. Trying to fit it into my busy summer. Thank you for being so patient with me! I've finally got it all done and have been loving the combination! I can't wait to see it complete with the room decor too. I didn't get a chance to set it up for my own photo opp., but Im sure she will get some pics back to me when she gets it set up. :)

Fabric chosen was Nicey Jane by Heather Bailey... LOVE!

I made two crib sheets and a crib skirt...


And for the quilt, I'd thought I would take pics of my progress...
Here is the quilt top pieced together:

I got it layered with the backing, and batting in the middle. And started stitching on it with my walking foot. And I highly recommend Machingers quilting gloves for a good grip while you are quilting! I've been using these for about a year now, and I got mine HERE.

Its all quilted now, so I trimmed up the edges...


I pieced my binding together with scraps. Started out with attaching the binding all the way around so it makes a nice straight seam when you flip the binding over to the back. And normally for my other quilts I would want to do a blind stitch for the back of the binding. But for my quick and easy Etsy baby quilts, I just like to do a wonky stitch on top of it. I did three runs around the edge and makes a cute design to it.
Its cute. Its quick. It works. :)

I put it in the washer and dryer and then its all done!
Here are some close ups of the binding and quilting detail...


I really wanted to get the quilt outside and take some pics on the grass... but it was still morning and kinda dewy, and I wanted to get these items out in the mail before lunch.
I'm sure once she gets around to getting the baby's room set up, she will take some cute ones for me. And Ill be more than happy to share them here.

thanks again a. m. :)